35

I have a pi running the latest release of raspbian and it's connected to the Internet using a wireless USB dongle. What I would like to do, is to share the pi's wifi connection so that any computer connected to the pi using a LAN cable would be able to receive the Internet. I had a look around the Internet but I can't seem to find anything of relevance. I'm familiar with this process on Windows and Mac OS X, but doing this on the pi has just got me stumped.

EDIT: I don't know whether this helps anyone but I am connected to the Internet on my pi via wlan0, but I would like to share that Internet connection via eth0.

MasterScrat
  • 103
  • 4

3 Answers3

43

For Raspbian Jessie

From this document:

We will use dnsmasq package for this purpose because it is combined DHCP and DNS server and also easy to configure.

If you want something a little more 'heavyweight', you can use the isc-dhcp-server and bind9 packages for DHCP and DNS respectively, but for our purposes, dnsmasq works just fine.

sudo apt-get install dnsmasq

We need to configure interfaces. We will assign a static IP address to eth0 which will be used as gateway. Open the interfaces file

sudo nano /etc/network/interfaces

Edit the eth0 section like this:

allow-hotplug eth0  
iface eth0 inet static  
    address 192.168.2.1
    netmask 255.255.255.0
    network 192.168.2.0
    broadcast 192.168.2.255

Next, we will configure dnsmasq. The shipped dnsmasq config file contains a lot of information on how to use it. So, I will advise to move it and create a new one.

sudo mv /etc/dnsmasq.conf /etc/dnsmasq.conf.orig  
sudo nano /etc/dnsmasq.conf

Paste the following into the new file

interface=eth0      # Use interface eth0  
listen-address=192.168.2.1 # listen on  
# Bind to the interface to make sure we aren't sending things 
# elsewhere  
bind-interfaces
server=8.8.8.8       # Forward DNS requests to Google DNS  
domain-needed        # Don't forward short names  
# Never forward addresses in the non-routed address spaces.
bogus-priv
# Assign IP addresses between 192.168.2.2 and 192.168.2.100 with a
# 12 hour lease time
dhcp-range=192.168.2.2,192.168.2.100,12h 

Edit the /etc/sysctl.conf file to enable packet forwarding

sudo nano /etc/sysctl.conf

Remove the # from the beginning of the line containing net.ipv4.ip_forward=1 This will enable packet forwarding on next reboot. But if you want to try it right now without reboot then do this.

sudo sh -c "echo 1 > /proc/sys/net/ipv4/ip_forward"

We also need to share RPi’s internet connection with the devices connected over Wi-Fi. We will configure a NAT between eth0 and wlan0:

sudo iptables -t nat -A POSTROUTING -o wlan0 -j MASQUERADE  
sudo iptables -A FORWARD -i wlan0 -o eth0 -m state --state RELATED,ESTABLISHED -j ACCEPT  
sudo iptables -A FORWARD -i eth0 -o wlan0 -j ACCEPT  

However, we need these rules to be applied every time we reboot the Pi, so run sudo sh -c "iptables-save > /etc/iptables.ipv4.nat" to save the rules to the file /etc/iptables.ipv4.nat. Now we need to run this after each reboot, so open the /etc/rc.local file with sudo nano /etc/rc.local and just above the line exit 0, add the following line:

iptables-restore < /etc/iptables.ipv4.nat  

And that’s all! Now just Reboot your RPi and you will be able to access Internet

sudo reboot

Updated for Raspbian Stretch

Above configuration won't work in newer version of Raspbian. So, I have created a script for this which make it possible in less pain.

Connect to WiFi network using this guide.

Download the script from here. Place it at /home/pi/

Open up /etc/xdg/lxsession/LXDE-pi/autostart file

sudo nano /etc/xdg/lxsession/LXDE-pi/autostart

Add the last line :

@lxpanel --profile LXDE-pi
@pcmanfm --desktop --profile LXDE-pi
@xscreensaver -no-splash
@point-rpi
sudo bash /home/pi/wifi-to-eth-route.sh

Make sure you have given full path to the file. And you're done. Now reboot to see the changes

sudo reboot
Arpit Agarwal
  • 581
  • 6
  • 10
11

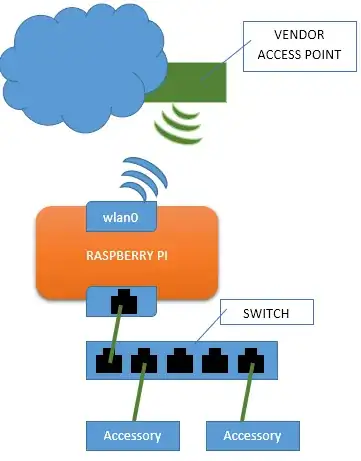
Being your purpose provide internet access to your LAN devices, will assume double 'NAT' will not be a big issue.
With this configuration you will provide wireless access to non WiFi devices that will benefit from internet access.
drawing

Prerequisite

Make sure your Wi-Fi is properly configured and working. if something goes bad your access to the device through `eth0` will be limited or inexistent.

Setup

We need a couple of packages to start:
apt-get update
apt-get install network-manager isc-dhcp-server

Interfaces

edit the file `/etc/network/interfaces` to match the following, this will set your eth0 a fix ip address (10.10.10.1) and will recreate `resolv.conf`.
auto lo
iface lo inet loopback

iface default inet dhcp

allow-hotplug eth0 iface eth0 inet static address 10.10.10.1 network 10.10.10.0 netmask 255.255.255.0 broadcast 10.10.10.255 gateway 10.10.10.1

auto wlan0 allow-hotplug wlan0 iface wlan0 inet dhcp wpa-conf /etc/wpa_supplicant/wpa_supplicant.conf up cat /etc/resolv.conf | sed 's/ver /ver 127.0.0.1,/g' > /etc/resolv_local.conf up cat /etc/resolv.conf | sed 's/ver /ver 127.0.0.1,/g' > /etc/resolv.conf

DHCP

Modify default `dhcp` configuration to make it authoritative and add the LAN network (10.10.10.*), edit the file `/etc/dhcp/dhcpd.conf`, add the following content:
# configuration for the bridge internal subnet.
subnet 10.10.10.0 netmask 255.255.255.0 {
  range 10.10.10.101 10.10.10.119;
  option domain-name-servers 8.8.8.8;
  option domain-name "domain.local";
  option routers 10.10.10.1;
  default-lease-time 600;
  max-lease-time 7200;
}

IPTABLES

Now create the following script to setup and start the network on every reboot. The script will dynamically create a few 'IPTABLES' rules. Name it `/root/bridge.sh`:
#!/bin/bash
LOCAL_IFACE=eth0
INET_IFACE=wlan0

this is where the dhcp info comes in. We need the default gateway

/var/lib/dhcp/dhclient.wlan0.leases

f=/var/lib/dhcp/dhclient.$INET_IFACE.leases GATEWAY=$(cat $f| grep "option route" | tail -1 |awk '{print $3}'| sed 's/;//')

IPT=$(which iptables)

get the wlan address

INET_ADDRESS=$(ifconfig $INET_IFACE |grep "inet addr" |awk '{print $2}' |awk -F$

Flush the tables

$IPT -F INPUT $IPT -F OUTPUT $IPT -F FORWARD $IPT -t nat -F

$IPT -t nat -P PREROUTING ACCEPT $IPT -t nat -P POSTROUTING ACCEPT $IPT -t nat -P OUTPUT ACCEPT

Allow forwarding packets:

$IPT -A FORWARD -p ALL -i $LOCAL_IFACE -j ACCEPT $IPT -A FORWARD -i $INET_IFACE -m state --state ESTABLISHED,RELATED -j ACCEPT

Packet masquerading

$IPT -t nat -A POSTROUTING -o $INET_IFACE -j SNAT --to-source $INET_ADDRESS $IPT -t nat -A POSTROUTING -o $LOCAL_IFACE -j MASQUERADE

save the created tables

iptables-save > /etc/network/iptables

#cat /proc/sys/net/ipv4/ip_forward

make sure we are forwarding packets

echo "1" > /proc/sys/net/ipv4/ip_forward sysctl --system > /dev/nul

#remove the default route, usually on eth0 interface route del default #ifdown $INET_IFACE && ifup $INET_IFACE #ensure is $INET_IFACE now... route add default gw $GATEWAY $INET_IFACE gw=$(route -n -A inet | grep '^0.0.0.0' |awk '{ print $2 }') echo "default route is now " $gw

Finally

Finally, you need to run the script on each reboot, add the following two lines before the `exit 0` on the file `/etc/rc.local' to run the script created before.
# will run the bridge on startup
sudo ./root/bridge.sh

Now, just restart your device and the bridge will be working for you.

pd: sudo was omitted for brevity. Use sudo -iE to have a session as root

fcm
  • 1,869
  • 2
  • 19
  • 30
1

This question is well due for an updated answer. Here's what worked for me, with explanations, so it can be tailored to suit.

This is applicable to a fresh Raspberry Pi OS Lite install, specifically 2023-05-03-raspios-bullseye-arm64-lite, configured for SSH access and connected over Ethernet. YMMV.

  1. Install dnsmasq.
sudo apt update
sudo apt install dnsmasq
  1. Configure dhcpcd.

Add to the bottom of /etc/dhcpcd.conf:

interface eth0
static ip_address=192.168.2.1/24
nogateway

The nogateway prevents the Pi from prioritising Ethernet as a potential route to the Internet, since it's now strictly a downstream port. Obviously static sets a static IP for the Ethernet port. This will play well with dnsmasq and provides a predictable gateway address for the clients.

The choice is fairly arbitrary, but I picked something distinctive that aligns with the other answers. If your WiFi happens to be on that subnet, you might want to pick something else to make it easier to distinguish them.

Being a downstream port we don't need to bother with gateway and DNS settings for the Ethernet port.

  1. Configure dnsmasq.

At the bottom of /etc/dnsmasq.conf add:

interface=eth0
#bind-interfaces # Causes silent failure on first boot because there's no eth0 to bind to at that time. Luckily, seems unnecessary.
#listen-address=192.168.2.1 # fails with “cannot assign requested address” because it’s redundant: https://forums.raspberrypi.com/viewtopic.php?p=1704404#p1704404
dhcp-range=192.168.2.50,192.168.2.100,12h
#server=1.1.1.1  # Forward DNS requests to Cloudflare. Not necessary at this level.
domain-needed   # Don't forward short names
bogus-priv      # Never forward addresses in the non-routed address spaces.

This configuration was the best I could find to ensure that a good working state would be established regardless of the sequence of power on and cable connections.

  1. Finally, packet forwarding.

In /etc/sysctl.conf uncomment net.ipv4.ip_forward=1. This configures the kernel to be happy to redirect packets that arrive on one interface to another. Otherwise the kernel acts like a normal host and just drops packets not intended for itself.

There's an equivalent for IPv6: net.ipv6.conf.all.forwarding=1, but I was able to get away with riding IPv4 a little longer. YMMV.

Now the kernel is happy, set up the forwarding:

sudo iptables -F # Flush all the chains (ie. delete all the rules) in the default "filter" table
sudo iptables -t nat -F # Do the same for the "nat" table
sudo iptables -t nat -A POSTROUTING -o wlan0 -j MASQUERADE # perform SNAT "the liberal way" by pretending to be the source of every outgoing packet 
sudo iptables -A FORWARD -i wlan0 -o eth0 -m state --state RELATED,ESTABLISHED -j ACCEPT # then forward anything we inititiated coming back in on Cellular, out to Ethernet, as if weren't here
sudo iptables -A FORWARD -i eth0 -o wlan0 -j ACCEPT # and vice versa

Make sure the forwarding sticks through reboots by saving the configuration and repeating it when the network interface comes up.

sudo iptables-save > pi-gateway.conf
sudo mv pi-gateway.conf /etc/pi-gateway.conf

Create /etc/network/if-up.d/iptables with contents:

#!/bin/sh
iptables-restore < /etc/pi-gateway.conf

Make it executable, and the Pi is baked ready for serving!

sudo chmod +x /etc/network/if-up.d/iptables

Reboot, test and monitor journalctl -u dnsmasq for any issues.

  • Reference: this is an abridged version of my solution for sharing a cellular dongle over Ethernet. There's a bit more opinionated commentary in that article.
Heath Raftery
  • 275
  • 1
  • 9