0

I’m using sysfs to control my rpi5’s pwm andI’m having an issue where only one of my pwm pins is outputting a value (The pin that is working is gpio 18/physical pin 12/pwm2). In the pinout.xyz page, it shows that physical pins 12/32/33/35 have built in hardware PWM. (Correct me if I’m wrong). I set up a circuit with 4 LEDs connected to physical pins 12, 32, 33 and 35, then I outputted values from all 4 pwm pins in the sysfs. Here are the commands I used:

Cd /sys/class/pwm/pwmchip2
Echo 0 > export
Cd pwm0
Echo 2000000 > period
Echo 1000000 > duty_cycle
Echo 1 > enable

I then did this with all the 3 pwm pins that weren't previously working by changing the export values but it wasn't for any of them. I will add that I have already set up the pwm via config.txt, by adding in dtoverlay=pwm, but I’ve had this grudge where that might only be setting up the default pin (gpio 18/physical pin 12/pwm2) and therefore that is the only one that is working. I’ve found this resource which has information about the config.txt modules here: and this resource shows that I can use dtoverlay=pwm<pin>=<pinvalue> to set up an individual pin. But even when I did this, nothing changed. I’m happy to provide more information about my specific circumstance if necessary, please ask and I will reply as soon as I can. Do you guys have any idea on why the pins of 35,33 and 32 aren’t set up correctly or just malfunctioning?
Matthew Moller
  • 75
  • 1
  • 12

2 Answers2

2

This worked for me.

I added in /boot/firmware/config.txt (in top section, optional hardware interface):

dtoverlay=pwm-2chan

Rebooted and tried the bash script.

Finally I got output on GPIO 18 (pin 12).

MatsK
  • 2,882
  • 3
  • 17
  • 22
Per
  • 21
  • 2
1

First thing to know is that there are only two (2) hardware PWMs. So that's all you're ever going to get from a single RPi! Here's how to get both PWMs working on an RPi 5:

1. Edit your config.txt file & reboot:

$ sudo nano /boot/firmware/config.txt 
#
# Once the file is open, REMOVE 'dtoverlay=pwm' if it's in there, and add one line:

dtoverlay=pwm-2chan

save & close config.txt, and then reboot:

$ sudo reboot ...

2. After your system has finished booting:

# verify the overlay is loaded:

$ ls /sys/class/pwm pwmchip0 pwmchip2 pwmchip6

Pi 5 PWM is on pwmchip2 - so:

$ cd /sys/class/pwm/pwmchip2

$ echo 2 > export && echo 3 > export

$ ls device export npwm power pwm2 pwm3 subsystem uevent unexport

^^^^ ^^^^

NOTE creation of folders 'pwm2' & 'pwm3'.

$ cd /sys/class/pwm/pwmchip2/pwm2

$ echo 2000000 > period && echo 1000000 > duty_cycle && echo 1 > enable

you should have a PWM pulse train on GPIO 18 (header pin 12) now.

$ cd /sys/class/pwm/pwmchip2/pwm3

$ echo 1000000 > period && echo 500000 > duty_cycle && echo 1 > enable

you should have a PWM pulse train on GPIO 19 (header pin 35) now.

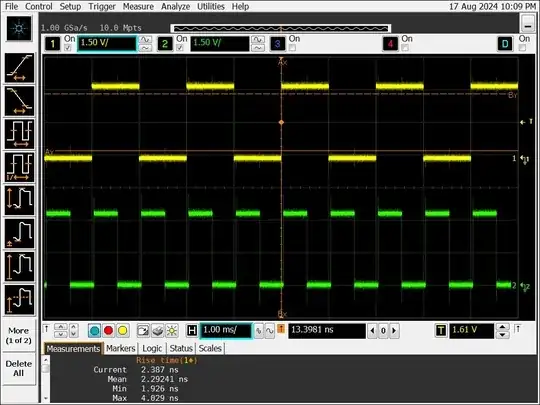
with the above settings, both PWM waveforms are 50% duty cycle,

and the frequency of pwm3 (GPIO 19) is twice that of pwm2 (GPIO18).

Following are the o'scope traces made of the PWM waveforms; GPIO18 is on top, GPIO19 on bottom.

oscope traces

If it helps, here's a bash script that does the setup (except adding the overlay to config.txt):

#!/bin/bash

cd /sys/class/pwm/pwmchip2 echo 2 > export sleep 1 echo 3 > export

cd /sys/class/pwm/pwmchip2/pwm2 echo 2000000 > period && echo 1000000 > duty_cycle && echo 1 > enable

cd /sys/class/pwm/pwmchip2/pwm3 echo 1000000 > period && echo 500000 > duty_cycle && echo 1 > enable

From your $HOME directory (/home/pi or whatever):

  • save the file in your home directory as: pwm_script.sh

  • make it executable: chmod 755 pwm_script.sh

  • run it: ./pwm_script.sh


NOTES:

  1. See this other answer on how to configure a single channel hardware PWM.
Seamus
  • 23,558
  • 5
  • 42
  • 83