163

I go back and forth from home to school with my Pi. I just got the WiFi working last night at home using wpa.conf instead of wpa_supplicant.conf as the book I was using had the walk thru for that instead. I've noticed lots seem to use wpa_supplicant but I not sure why...

Anyway, I know how to make the WiFi IP static for my home network but how do I set things up for auto-connecting to my school WiFi and use a different static IP for that network?

For the network do I just add another network={} in my wpa.conf file? For the second static IP how do I bind that to the school network?

Chef Flambe
  • 1,873
  • 3
  • 13
  • 12

6 Answers6

136

This post was OK at the time for Wheezy. DO NOT USE

Edit /etc/wpa_supplicant/wpa_supplicant.conf and add id_str="school" under the schools wpa info and id_str="home" under your homes wpa info. Your file should now look similar to this:

ctrl_interface=DIR=/var/run/wpa_supplicant GROUP=netdev
update_config=1

network={ ssid="SCHOOLS NETWORK NAME" psk="SCHOOLS PASSWORD" id_str="school" }

network={ ssid="HOME NETWORK NAME" psk="HOME PASSWORD" id_str="home" }

Then set up /etc/network/interfaces with iface school inet static and iface home inet static in it so it looks like the following:

This applies to Raspbian Wheezy prior to 2015-05-05 for later (and Jessie) See How do I set up networking/WiFi/Static IP

auto lo

iface lo inet loopback iface eth0 inet dhcp

allow-hotplug wlan0 iface wlan0 inet manual wpa-roam /etc/wpa_supplicant/wpa_supplicant.conf

iface school inet static address <school address> gateway <school gateway> netmask <school netmask>

iface home inet static address <home address> gateway <home gateway> netmask <home netmask>

Milliways
  • 62,573
  • 32
  • 113
  • 225
11chubby11
  • 4,872
  • 5
  • 26
  • 32
52

With Raspbian Jessie release, you don't have to edit the interface file. Just updating the /etc/wpa_supplicant/wpa_supplicant.conf file with multiple networks would suffice. Here's how it looks -

ctrl_interface=DIR=/var/run/wpa_supplicant GROUP=netdev
update_config=1

network={ ssid="SCHOOLS NETWORK NAME" psk="SCHOOLS PASSWORD" id_str="school" }

network={ ssid="HOME NETWORK NAME" psk="HOME PASSWORD" id_str="home" }

This worked for me and my wifi is always connected to the list of available networks mentioned in the above file. Hope it helps.

Madacol
  • 103
  • 3
giri-sh
  • 787
  • 10
  • 18
44

I recently stumbled across a console application that sorts all the wireless configuration hell out. You can also use this tool to configure the LAN interface.

sudo apt-get install wicd-curses

It will install quite a few other packages but it runs its own daemon in the background. This manages the networks and makes sure you connect to the ones you want. Run it with:

sudo wicd-curses

Screenshot of wicd-curses

If you get a message saying no networks detected press P (must be capital so use [SHIFT]p) and type in wlan0 in the wireless interface field and press F10 to save.

  1. R to refresh the list.
  2. Use the cursors on the keyboard to navigate up and down the list
  3. Press right to configure the wireless connection
  4. Press down a few times and check "Automatically connect to this network"
  5. Press down a few times again and type in your password in the key field
  6. Press F10 to save
  7. Start from 1 to do this again for any other networks

enter image description here

You might have to press C to connect to the access point. If you were connected via cable, that will most likely kill the LAN interface and bring up wireless.

It is also manages the connection so it will reconnect to any configured wireless access points if it drops out for whatever reason but it will also try to connect to any available networks, just like in Windows, Macintosh or Linux Desktops.

Hope it helps!

jncraton
  • 103
  • 2
Piotr Kula
  • 17,336
  • 6
  • 66
  • 105
24

Actually you can add the priority option. Like so:

network={
      ssid="open"
      key_mgmt=NONE
      id_str="open"
      priority=3
}

network={
        ssid="secure"
        key_mgmt=WPA-EAP
        proto=WPA2
        group=CCMP
        pairwise=CCMP
        eap=TLS
        ca_cert="/etc/certs/cacert.pem"
        client_cert="/etc/certs/client.pem"
        private_key="/etc/certs/client.key"
        private_key_passwd="somepwd"
        identity="me"
        priority=5
}

network={
        ssid="AndroidAP"
        key_mgmt=WPA-PSK
        proto=WPA2
        pairwise=CCMP
        group=CCMP
        psk="SomeP4ssw0rd"
        priority=4
}


network={
        ssid="Spooky"
        key_mgmt=NONE
        group=WEP104
        psk="A4ABC2FC27412D4D23CAEBCA23"
        priority=2
}

network={
        ssid="another"
        key_mgmt=WPA-PSK
        proto=WPA2
        pairwise=CCMP
        group=CCMP
        psk="A very long and secret passphrase here"
        priority=1
}

priority: when multiple networks are available simultaneously, the one with the highest priority value is selected.

id_str: for each network, you can give this parameter a specific value (a string). If none is provided, "default" is used as text string. This string is used in /etc/network/interfaces as a virtual interface identifier. This allow creating specific configuration blocks for each network. The only requirement is to have the physical interface using the "inet manual" method (this is a MUST).

Patrick Cook
  • 6,365
  • 8
  • 38
  • 63
les
  • 371
  • 3
  • 6
15

It's May, 2024, and the question "How to setup multiple WiFi networks?" now has two answers, depending upon your OS version (or which network manager you're using). At least one of them is straightforward (you can decide which :) ...

  • one for bullseye (using dhcpcd as the network manager)
  • one for bookworm (using NetworkManager as the network manager)

:: for bullseye (using dhcpcd as the network mgr)

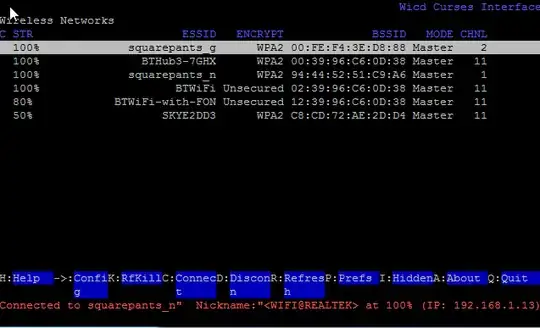
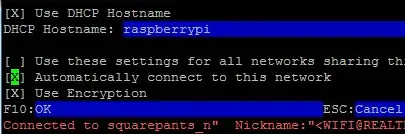
If you use multiple WiFi networks in different locations, all that is needed is to configure each of these networks in the file /etc/wpa_supplicant/wpa_supplicant.conf - configure as many as you need!

The wpa_supplicant.conf file proposed in the currently selected answer is still correct, though the id_str is optional:

ctrl_interface=DIR=/var/run/wpa_supplicant GROUP=netdev
update_config=1

network={ ssid="SCHOOLS NETWORK NAME" psk="SCHOOLS PASSWORD" }

network={ ssid="HOME NETWORK NAME" psk="HOME PASSWORD" }

Unless you are "Home Schooled", which is to say that two or more networks are available in a given location, it's not necessary to create a priority for the networks :) By default, all networks listed in wpa_supplicant.conf have equal priority, and when priority is equal wpa_supplicant will choose the network with the greatest signal strength (all other things being equal). This will come as a disappointment to the knob turners, but beyond properly defining the networks in wpa_supplicant.conf, there is really nothing else to be done in the situation defined by the OP.

If you do have two or more networks in a given location, then a priority assignment to your "favored" network may be appropriate. Another exception may be that you have a need to switch between networks. If you need to dynamically switch between networks, - there's another answer for that. Otherwise, leave it alone.

:: for bookworm (using NetworkManager as the network mgr)

NetworkManager (the default network mgr. in bookworm is a bit more complicated than using a wpa_supplicant.conf file:

Multiple WiFi networks in different locations are configured using either nmcli (or nmtui if you prefer the ncurses semi-gui interface). nmcli and nmtui are two tools for configuring networks under NetworkManager - which also includes a full GUI interface if you use X or Wayland on your RPi. For this answer we'll stick with nmcli as it's a more general tool - it has all the "features", and is applicable whether you're running X/Wayland or the Lite/headless version of RPi OS.

Adding a new/different network under NetworkManager is characterized as creating a connection. A connection is simply a file container for all the information needed to connect to a network! From the CLI, a new connection named 'NewWiFi' may be added as follows:

sudo nmcli connection add con-name "NewWiFi" type wifi ifname wlan0 ssid "SSID_NAME"

Where "SSID_NAME" is the name of the SSID used on "NewWiFi".

Connecting to "NewWiFi" is accomplished with a 2nd command:

sudo nmcli dev wifi connect 'NewWiFi' password 'mypasswd'

Of course nmcli (and in general NetworkManager) have many, many more options and features. There's a different syntax for adding a fixed IP address, but I'm not going to cover that here. And ordinarily I'd recommend reading the man page (man nmcli), but I'm not going to do that here... it's far too arcane IMHO! There are numerous blog posts that offer read-able advice; here's the best one that I've found so far.

be skeptical !

Readers should carefully consider adopting networking advice in a piecemeal fashion; there are numerous fallacies and foolishness embedded in some of the answers and comments here. Some that I noticed:

  • Then set up /etc/network/interfaces with iface school inet static and iface home inet static

    Two major no-nos here:

    1. dhcpcd now handles network management for RPi - this file should not be edited unless you know what you're doing
    2. static ip assignment is almost never a good idea - esp. when you're using a network you don't manage.
  • If you edit the wpa_supplicant.conf file, you need to restart the demon to get it to read the new .conf ...

    No - not true; that may work, but a less disruptive method is to use the wpa_cli app to handle this; see the ArchWiki for details

And there are others, but impossible to list them all here. Be diligent - and that goes for this answer also!


NOTE: This answer works for systems through bullseye, and bookworm. In bookworm the RPi Organization replaced dhcpcd with NetworkManager, and thus the answer to the OP's question has changed considerably. NetworkManager seems (to me) to be more than just a little overkill for a small system such as Raspberry Pi. The OP's question (which contains at least one significant error) illustrates this opinion capably. Hopefully, most readers can see that nmcli complicates the answer considerably - if not, try reading man nmcli!

But OTOH, dhcpcd has had a few issues of its own. I wonder if part of the problem was that the RPi Organization ignored/overlooked five (5) major version upgrades to the upstream dhcpcd, and stubbornly stuck with dhcpcd ver 5?

For those interested, there is a thread in the RPi Forums website that describes how to revert to dhcpcd5 on bookworm I've not tried this - yet.

Seamus
  • 23,558
  • 5
  • 42
  • 83
0

Apparently, in 2024 you just use:

sudo nmtui

reference: https://forums.raspberrypi.com/viewtopic.php?t=363820

MandoMando
  • 119
  • 2