0

This is not and will not be a duplicate. This is a thread meant to share a solid soliton I figured out with the rest of the community and update it as I optimize it, ad-hoc. So I had visited StackExchange Arduino community to check if there is a better way to make a servo move smoother, since if we assing a new position to a servo that is attached on an arm, it moves like an attacking karateka.

I found these threads:

Smooth servo control library (Dat-ha provided a piece of code that I suggest a correction here)

I also checked this: My Servo Won't Sweep Smoothly

I will self-answer and update this thread, as I make a full arm code working properly and include instructions for the rest of the people to save everyone some time. I still haven't added the capacitor that is suggested on the threads but I will ASAP.

George Eco
  • 111
  • 1
  • 4

3 Answers3

4

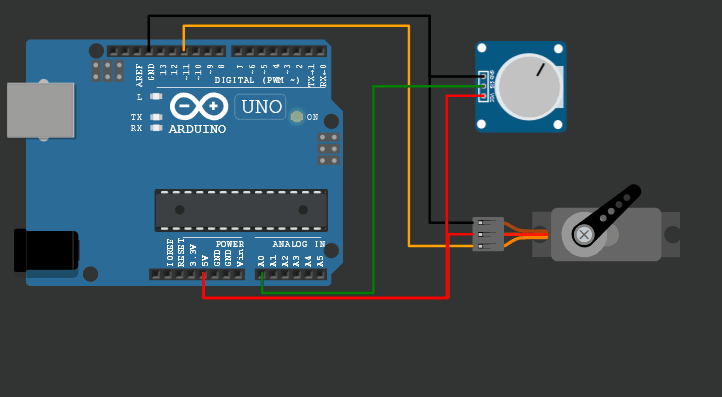
Your original solution uses blocking code (the for loops with delay() calls in them). Surely that works, but it can easily get you in trouble, when extending the project with more functionalities (since nothing else can be done during the sensor movement). So I would suggest a way to ditch all blocking for loops and delays, so that other code can run during the servo movement. For this we can use millis() and the coding principle from the BlinkWithoutDelay example, that comes with the Arduino IDE.

#include <Servo.h>

Servo servo1; int set_angle = 0; int current_angle = 90; // setting starting angle to 90 degrees unsigned long servo_timestamp = 0; #define SERVO_INTERVAL 10 // changing the servo position every 10ms, defines the speed of the servo

void setup() { servo1.attach(11); // connect Servo to pin 11 pinMode(A0, INPUT); // Connect potentiometer or Joystick x or y pin to A0 input }

void loop(){ if(millis()-servo_timestamp > SERVO_INTERVAL){ servo_timestamp += SERVO_INTERVAL; // increment our timestamp by the servo interval // Measure the new set_angle only, if we really want to move the sensor int val1 = analogRead(A0); // Read the potentiometer position set_angle = map(val1, 0, 1023, 0, 180); // Map the value to be used with servo

    // Increment or decrement the current angle according to the set_angle
    // and don't change it, when we already are at the set_angle
    if(set_angle &gt; current_angle){
        current_angle++;
    } else if(set_angle &lt; current_angle){
        current_angle--;
    }
    // Write the new angle to the servo
    servo1.write(current_angle);
}

}

For learning more about the non-blocking coding style using millis(), you can google for it and look at the BlinkWithoutDelay example. There are many resources for this on the web. The combination of timestamp and millis() if statement executes the code inside the if statement at the regular interval SERVO_INTERVAL. There we read the potentiometer and calculate the new setpoint for the servo angle. Then we increment or decrement the current angle by 1 depending on the set angle. And then we write that new angle to the servo.

You can change the speed by either changing SERVO_INTERVAL or by in-/decrementing current_angle by more than only 1.

The code outside the if statement still runs at full speed. So in the (a bit less than) 10ms, that the servo code isn't running, you can execute other code. Also this code will react immediately, where a blocking code would first let the servo run to the set position and only then change again.

Note: The above code isn't tested. It's purpose is to show the principle. There might be small errors, that I haven't seen.

chrisl
  • 16,622
  • 2
  • 18
  • 27
3

Here are the simulation results of the code from Chrisl enter image description here

The code (same as the other answer)

#include <Servo.h>

Servo servo1; int set_angle = 0; int current_angle = 90; // setting starting angle to 90 degrees unsigned long servo_timestamp = 0; #define SERVO_INTERVAL 10 // changing the servo position every 10ms, defines the speed of the servo

void setup() { servo1.attach(11); // connect Servo to pin 11 pinMode(A0, INPUT); // Connect potentiometer or Joystick x or y pin to A0 input }

void loop(){ if(millis()-servo_timestamp > SERVO_INTERVAL){ servo_timestamp += SERVO_INTERVAL; // increment our timestamp by the servo interval // Measure the new set_angle only, if we really want to move the sensor int val1 = analogRead(A0); // Read the potentiometer position set_angle = map(val1, 0, 1023, 0, 180); // Map the value to be used with servo

    // Increment or decrement the current angle according to the set_angle
    // and don't change it, when we already are at the set_angle
    if(set_angle &gt; current_angle){
        current_angle++;
    } else if(set_angle &lt; current_angle){
        current_angle--;
    }
    // Write the new angle to the servo
    servo1.write(current_angle);
}

}

You can tweak the code and see the changes online- Link to the arduino simulation

ArduinoFan
  • 1,079
  • 7
  • 11
0
  #include <Servo.h>
    Servo servo1;
    int previousangle1;
    int dc; 
    void setup()
      {
        dc = 10;    // Delay calibration 
        servo1.attach(11);  // connect Servo to pin 11
        pinMode(A0, INPUT); // Connect potentiometer or Joystick x or y pin to A0 input
        previousangle1 = 90; // Initialize position to 90 degrees (180 degree servo)
      }

    void loop()
      {     

      int val1 = analogRead(A0); // Read the potentiometer position
      int angle1 = map(val1, 0, 1023, 0, 180); // Map the value to be used with servo

      if(angle1>previousangle1)
      {
        for(int i=previousangle1; i<=angle1; i++)
        {
          servo1.write(i); //turn servo by 1 degrees
          delay(dc);        //delay for smoothness
        }
      }
      // Fix: This needed to be an else if 
      // Original piece of code had it as a second stand alone if
      else if(angle1<previousangle1)
      {
        for(int j=previousangle1; j>=angle1; j--)
        {
          servo1.write(j); 
          delay(dc);        
        }
      }
      delay(dc);  
      previousangle1 = angle1; 
      }

What you need to do now, is make similar code, with different variables for all 4 servos. I still have to check the addition of a capacitor to make it work even better.

Original code is taken from here: https://arduino.stackexchange.com/a/29970/76974

I will edit this, adding code for the rest of the servos later on.

George Eco
  • 111
  • 1
  • 4