1

I'm trying to read 4 analog inputs (1kHz speed). I changed the prescaler to 16 for my Arduino Leonardo according to this link. I then tried to read the analog pins and I used the following code to display the time and the readings:


#define FASTADC 1
// defines for setting and clearing register bits
#ifndef cbi
#define cbi(sfr, bit) (_SFR_BYTE(sfr) &= ~_BV(bit))
#endif
#ifndef sbi
#define sbi(sfr, bit) (_SFR_BYTE(sfr) |= _BV(bit))
#endif
double t = 0;
void setup() {
  int start;
  int i;
  #if FASTADC
  // set prescale to 16
  sbi(ADCSRA, ADPS2);
  cbi(ADCSRA, ADPS1);
  cbi(ADCSRA, ADPS0);
  #endif

  Serial.begin(9600);
  Serial.print("ADCTEST: ");
  start = millis();
  for (i = 0 ; i < 1000 ; i++)
    analogRead(0);
  Serial.print(millis() - start);
  Serial.println(" msec (1000 calls)");
}

// the loop routine runs over and over again forever:
void loop() {
  // print out the value you read:
  t = millis() / 1000;
  Serial.print(t);
  Serial.print('\t');
  Serial.print(analogRead(A0)); delay(1);
  Serial.print('\t');
  Serial.print(analogRead(A1)); delay(1);
  Serial.print('\t');
  Serial.print(analogRead(A2)); delay(1);
  Serial.print('\t');
  Serial.println(analogRead(A3)); delay(1);
}

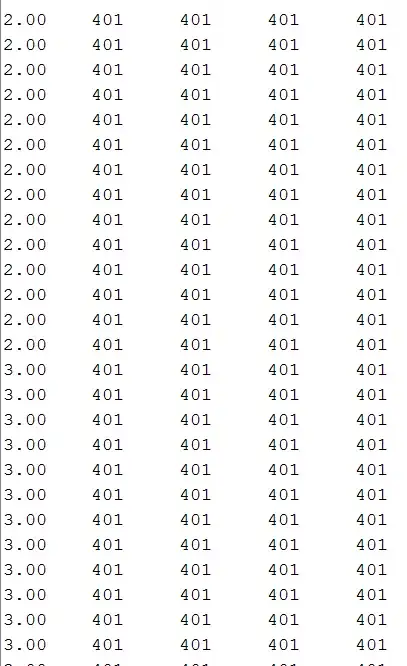
I connected 2V from the DC supply to all the 4 channels and the readings were similar. I used the output from the serial monitor and pasted the readings for 1 sec in Excel to see the frequency. With a 9600 baud rate and no delay between the readings I got 200 Hz (for the 4 analog inputs).

Why is that happening? And is there a relationship between the sampling frequency and the baud rate? Is my way of finding the frequency correct? If not what's the right way?

Finally, I'll be plotting the readings in Matlab, so I guess this will affect the sampling frequency. How can I control it so that I'm sampling with 1kHz rate for all the channels?

Here is the screenshot of the readings from the 4 channels (2V input).

enter image description here

Summarizing everything, I need to know the following:

  1. The effect of adding a delay between every two readings on the accuracy of the readings and the sampling frequency.

  2. How to find the best sampling frequency for every input and how to control it?

  3. Will using Matlab to plot the data affect the sampling frequency?

Thanks.

EDIT: I accepted the answer below, if anyone has the same problem , please make sure that you change the prescaler as I mentioned above for the best results.
Isra
  • 95
  • 3
  • 11

4 Answers4

2

At first I thought that the main problem was not that you too slow at sampling, but that you were too slow at transmitting the data. As Edgar already stated, at 9600 b/s you need 22.88ms to send a line, so the maximum frequency is less than 50Hz.

However as you experienced, the speed you are getting is 200Hz. This is because that calculation is right in the case of a real serial interface. Arduino Leonardo, on the other hand, emulates the serial interface. But.. There is no such thing as baud rate. If you look at the CDC emulation source code you will see that the baud rate you pass to the begin function is ignored.

So... Why is it still slow? Because you are using the delay function! You are waiting for 1ms every time you perform an acquisition, and then you still have to perform all the sending. This has two errors embedded: 1) using the delay function breaks the timing - better use a timer - and 2) you are too slow.

Now, if you want a 1kHz sampling (or any delay multiple of 1ms) you already have a timer running (so you can just use that):

#define INTERVAL_LENGTH_US 1000UL

unsigned long previousMicros;

void loop()
{
    unsigned long currentMicros = micros();

    if ((currentMicros - previousMicros) >= INTERVAL_LENGTH_US)
    {
        previousMicros += INTERVAL_LENGTH_US;

        int val_a0 = analogRead(A0);
        int val_a1 = analogRead(A1);
        int val_a2 = analogRead(A2);
        int val_a3 = analogRead(A3);

        Serial.print(((double)currentMicros) / 1000000UL, 1); // 1 is the number of decimals to print
        Serial.print('\t');
        Serial.print(val_a0);
        Serial.print('\t');
        Serial.print(val_a1);

        Serial.print('\t');
        Serial.print(val_a2);
        Serial.print('\t');
        Serial.println(val_a3);
    }
}

NOTE: The millis() function is replaced by micros() according to Edgar's and Nick's comments.

Change just the define to change the sample time. Now its set to 1000us (i.e. 1ms, so 1kHz), but don't go much higher otherwise you will have to check accurately the sampling time and the transfer speed. The t variable is not needed anymore.

Just a side note: this will also fix the bug in your code that prevents the program to display the current timing (instead of printing 2.5 it prints 2.0).

If you need a faster sample rate you should use another timer to get the correct timing, but again avoid delays. Not needed anymore

Edgar Bonet
  • 45,094
  • 4
  • 42
  • 81
frarugi87
  • 2,731
  • 12
  • 19
1

Two ways to sample at or near a given frequency:

  1. Select the right ADC clock prescaler. This has some limitations and may not get you too the precise sampling frequency.

  2. Use a timer to trigger the sampling. Can be done in either. Hardware or software. It is the most flexible way here, especially if coupled with the ADC isr.

dannyf
  • 2,813
  • 11
  • 13
0

I tried your program on my Arduino Uno with similar results : it prints about 44 lines per second. Then I did the math:

Each line consists of 22 characters, including the CR and LF at the end. Each character is transmitted as 10 bits (8 data bits, one start bit and one stop bit). At 9600 bits/second, each bit takes 0.104 ms to be transmitted. All this amounts to 22.88 ms per line (22 × 10 × 0.104), or about 43.7 printed lines per second, on average.

Now, since you are using a Leonardo, things could be a little different, as the Leonardo does not use a real serial port, but a virtual one. You may still try to increase the baud rate to see if it makes any difference.

Edgar Bonet
  • 45,094
  • 4
  • 42
  • 81
0

A few recommendations to get good performance out of the Arduino boards.

  • Maximize your analogResolution if the default is not already the max (as in the case of the Due.)
  • If possible, use a simple oscillator instead of a constant Voltage source. If you can create a sine or triangle wave with its peaks within the Arduino's input voltage range, you can plot something more interesting than a straight line.
  • There is no need to do any analogReads in setup(), and you DON'T want to do anything with the Serial object in setup() except configure it. (There is an under-the-hood reason for that.)
  • To get good sample rates from the Arduino boards, don't convert to text until MUCH later in the data flow. TO try this SIGNIFICANT speed optimization, declare an array of 4 elements of type unsigned int, another array of 12 elements of type unsigned char, and an unsigned long to hold the time.
  • In loop(), start by assigning micros() to the unsigned long
  • Then call the four analogReads in an uninterrupted sequence, assigning them to the four elements of the unsigned int array.
  • Then copy the four bytes from the unsigned long and the eight bytes from the four unsigned ints into the 12 elements of the unsigned char array. You will need to use the C++ shift right operator ">> 4" and the "(unsigned char)" type conversion to do this part.
  • Then, still in loop(), call Serial.write(byteArray, 12) once to send the time and digital representations all at once (in the byte order you specified) through the serial connection.
  • Place delayMicroseconds at the very end of the loop to get a higher resolution delay between loop iterations.
  • On the other side of the serial connection (the workstation or laptop) use dd or some other low level transfer program (instead of a terminal emulator) to copy from the binary 12-byte sample vectors from the serial device that your workstation or laptop uses to access the serial connection to a binary file.

The above eliminates several bottlenecks typical of the newbie example programs. The issue remaining is that, to optimize speed, you never converted the raw binary data vectors to a tab-delimited text file that MATLAB or GnuPlot can read with ease.

A simple C, Java, or Python program can then read the 12 byte vectors and convert the byte groups of 4, 2, 2, 2, and 2 back into the 32 bit time stamp and the four 16 bit unsigned channel values in a loop. The byte order is what you chose in your Arduino sketch. You will need to use the left shift operator and bitwise and and or operations to reconstruct the time stamp and four channel values. At the end of this loop, you can write these values as a single tab-delimited line coresponding to the current binary input vector. Iterate through all the vectors to get a complete tab-delimited data file.

You can experiment with different delayMicrosecond values to get different sample rates, and you can calculate our baud rate to stay ahead of the sampling so that the program could theoretically run indefinitely without backing up the Serial buffer on the Arduino side. Each Arduino analogRead and Serial object has its own maximum speed, which you can find by experimentation.

Douglas Daseeco
  • 274
  • 1
  • 7