10

I have connected to my raspberry via ssh from another pc. I would like to show an image that is on my raspberry to the screen of my PC. I tried to follow the answer of this question by astrogeek.

Suppose my raspberry user is pi and the user pc is pc.

I executed on my pc the command

xhost +pi@<rasp_ip>

and on the terminal connected via ssh to the raspberry

DISPLAY=pc@<pc_ip>:0

but when I try to open the *jpg image with fbi and other tools but nothing.

Does anyone know how to do that without copying the image locally?

Will the same method work using the pi-camera in real-time with the command raspistill -t 3000 for example?

EDIT: My PC OS is Ubuntu.

Francesco Boi
  • 593
  • 2
  • 7
  • 20

5 Answers5

7

Another option with Raspbian is feh.

  1. connect from your pc with ssh -X user@ip.of.your.pi (capital X!)
  2. user@raspi:~ $ feh /path/picture.jpg

Note: loading is not superfast, wait patiently.

If the package feh is missing, you can install it via cli:

sudo apt-get update; sudo apt-get install feh

Fabian
  • 1,288
  • 1
  • 10
  • 19
5

Displaying a picture via ssh taken literally:

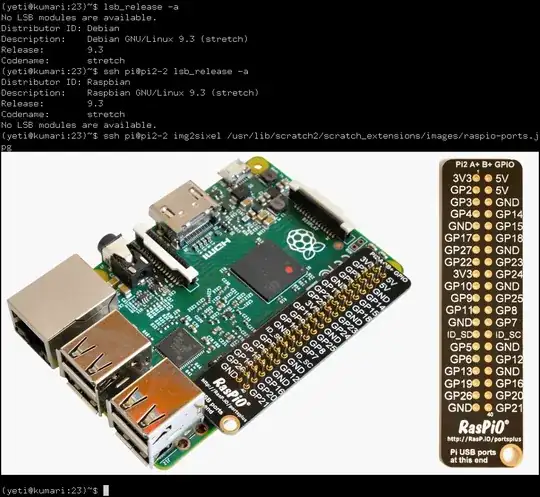
Install libsixel-bin on the PI and use a sixel enabled terminal on the PC. Debian's XTerm can do this, so probably Ubuntu's XTerm too.

Add this to your $HOME/.Xresources on the PC:

XTerm*decTerminalID: vt340
XTerm*numColorRegisters: 256

Sixel over SSH

More info about Sixel stuff is at github.com/saitoha/libsixel.

2

If you have default Ubuntu install you can "mount" your Raspberry with SSH connection, and browse it easily like local directories.

In Nautilus (default file browser) edit the Location (press Ctrl+L to focus Location Bar), enter something like this:

sftp://username@host:port/path

For example:

Screenshot showing sftp usage

You may omit port if its SSH's default 22, and of course you can use literal host_name if you have DNS or host_name.local if your LAN machines use mDNS.

Greenonline
  • 2,969
  • 5
  • 27
  • 38
madneon
  • 529
  • 2
  • 5
  • 16
1

From your Ubuntu machine

xhost +
ssh -X pi@<rasp_ip>

Once you are connected, calling your graphic applications will open them on your connecting computer.

Chetan Bhargava
  • 1,252
  • 3
  • 15
  • 29
0

The easiest way I am aware of is UV4L, because you can get a video stream or JPEG pictures in real-time of what the Raspberry Pi is displaying on the HDMI screen connected to it (or would be displaying, if you do not have an HDMI screen connected). It's easy because you just open the browser and type the correct URL (e.g. http://rpi_address:8080/stream/webrtc) to start the stream in the page. There is also a button to record the video in standard .webm. Furthermore, it's possible to send key strokes from your PC to the Raspberry Pi to control it from within the browser itself, but this is another story. You do not necessarily need an X server running on your Rpi.

To do this, you will have to install the raspidisp driver by following these instructions which mention this about raspidisp at the bottom of the page:

The raspidisp driver turns HDMI-out into a virtual Video4Linux-compliant input device (like a camera). You do not necessarily need a display connected to the Raspberry Pi HDMI-out port. In other words, this driver can capture whatever you see or would see on the screen.

This is useful if you have an headless Raspberry Pi. With the help of the UV4L Streaming Server you can have full control of the Raspberry Pi from within any browser (running on a PC in the same network, for example). In facts, it’s possible to stream the frame buffer of Raspberry Pi to a standard web page in the browser (plugin-free) with very low latency and, at the same time, forward keyboard or mouse input events from the PC to the Raspberry Pi. If you want to try this, apart from uv4l-raspidisp, the uv4l-raspidisp-extras package has to be installed:

$ sudo apt-get install uv4l-raspidisp-extras

The above package includes a system service that automatically starts an uv4l instance at boot and, if installed, also an instance of the Streaming Server listening to port 9080 by default. The service instructs uv4l to parse the configuration file /etc/uv4l/uv4l-raspidisp.conf for the initial setting values.

This is a DEMO, more focused on showing its read-time capabilities, but you can get the idea.
cacachu
  • 121
  • 2