6

I am upgrading to a Raspberry Pi B+. These are my concerns:

  • I have RASPBIAN via NOOBS on a full sized 16GB SD card.
  • How do I get that onto a 64GB Micro SD card?
  • raspi-config does NOT support expanding a partition if you installed via NOOBS so I cannot just DD the card to another and later expand via raspi-config.

Some of my thoughts on how to solve the problem.

  1. DD is out isn't it as NOOBS doesn't support partition resizing via raspi-config. Is there another way to expand?
  2. Can I make a tar backup and restore that? Do I have to reinstall Rasbian fresh and extract the tar onto itself? If I do restore it that way, how do I ensure things I removed from Raspbian also get removed and I don't just dump a load of stuff onto?
  3. Is there any way to mount the new MicroSD card onto my original Pi via USB adapter and then clone form itself onto the mounted MicroSD via adapter? rpi-clone is out thought as that also does not support NOOBS (Man I hate I used NOOBS, I thought it was just the new supported method - not the 'locked on your same card forever' method)
  4. Can I get RASPBIAN running on my new B+ on its MicroSD (no NOOBS this time!) and then network it with my original B model with SD and somehow RSYNC from the B to the B+? How do I ensure this will remain bootable and anyone have any experience with the right commands for this?

I really REALLY would appreciate some help with this. I haven't seen a solution anywhere and spent the entire day yesterday googling and searching these forums.

Please also note: I have access to Debian/Ubuntu/Mint/Mac desktops if they are of use.

My current plan....

  1. Flash a fresh RASPBIAN onto the micro-SD card so that it is partitioned correctly and has FAT drive etc
  2. Insert via USB SD reader the micro-SD into running Pi
  3. Format the RASPBIAN partition on the micro-SD blank leaving just the FAT partition
  4. DD from my noobs RASPBIAN partition on my original SD to the micro-SD via adapter
  5. Put the micro-sd into new B+ and hope for the best
  6. If it does boot hopefully use raspi-config to expand the partition (as it will now no longer be NOOBS)

Should this work? Will it boot?

Remember this is going from a NOOBS-Raspbian to a Regular-Raspbian... can that even be done?!

I don't see anyone ever accomplishing this ever before...
Piotr Kula
  • 17,336
  • 6
  • 66
  • 105
mrmrw
  • 63
  • 1
  • 1
  • 4

3 Answers3

2

I moved from an 8GB card to 16GB.

  1. sdformatter, format new card
  2. win32diskimager read old card, write new card
  3. gparted(iso) moving swap to max right(not left as written above), and maximize the root partition.
Jacobm001
  • 11,904
  • 7
  • 47
  • 58
thomas
  • 21
  • 2
2

I just successfully moved from a 6GB NOOBS install to 64GB card. My install didn't have a Swap partition. This meant the other answers here didn't provide me with the information I needed.

The steps I followed:

  1. Copied the 6GB card to the 64GB card by following this guide. A brief summary is included below:

    • Inserted the 6GB card into my mac.
    • Created a disc image of this card.
    • Inserted the 64GB card into my mac.
    • Copied the disc image onto the 64GB card.
  2. Ran GParted Live from USB on a Windows machine.

  3. Followed this guide for editing the partitions with GParted.

I've included the main points from the guide to editing the partitions with GParted below:

Note: I didn't run into errors when using. Be sure that you've unmounted the partitions before trying this.

Select partition labeled SETTINGS – Right Click- Resize/Move, At Resize/Move – Drag the Bar from Left to Right – Click Resize/Move.

Select extended File System (Cyan Color) – Click Resize/Move, At Resize/Move – Expand the Bar From Left to Right – Click Resize/Move.

Select partition labeled root – Right Click – Resize/Move, At Resize/Move – Expand the Bar From Left to Right – Click Resize/Move.

Select parition labeled SETTINGS – Right Click – Resize/Move, At Resize/Move – Expand the Bar from Right to Left – Click Resize/Move.

Click Apply All Operations at taskbar to Apply the changes.

Davie Brown
  • 136
  • 4
1

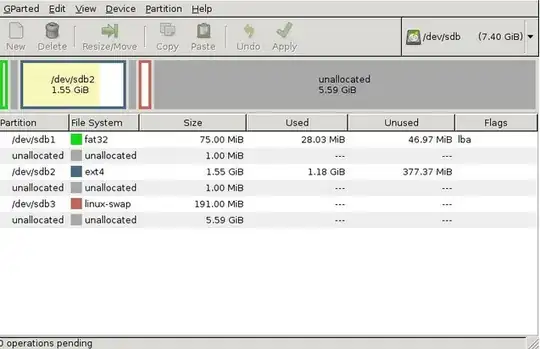
If you have access to an Ubuntu or other Linux desktop I would suggest using gparted but you can also download a gparted live disk - Burn it and boot from it.

After you have copied the 16GB to the 64GB SD card, boot up or start gparted and once its ready insert your 64GB SD card The images demonstrate resize small to 8GB max before the auto resize was available - The process is the same

enter image description here

  1. The FIRST STEP is to move the swap partition to the end of the card.
    1. Select the SWAP and click resize/move.
    2. You should be able to visually drag the partition to the far left.(make sure NOT to resize it by any mistake)
    3. Accept
  2. Click on the system partition and then again do a resize/move option.
    1. This time you will drag the right edge of the partition, to resize it, all the way to the far right side.
    2. Accept
  3. Click apply
    1. Let it do its magic ...

So once that is done put the SD card in the PI and boot it up!

gparted is a really great tool for resizing and managing partitions.

Piotr Kula
  • 17,336
  • 6
  • 66
  • 105