1. The first step is to connect the sensor to the RPi:
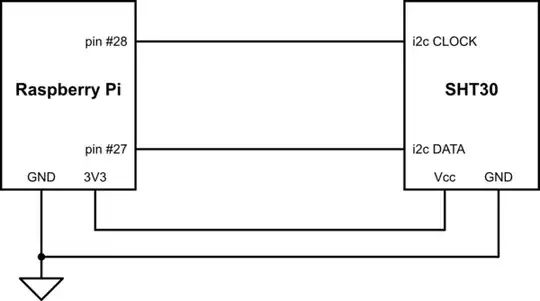
simulate this circuit – Schematic created using CircuitLab
2. The second step is to declare an overlay:
Run raspi-config; in the Interfaces section, ensure that the I2C interface is enabled. Note that I use i2c0 for this example, but any available i2c channel may be used. Open file /boot/firmware/config.txt (for RPi OS 'bookworm') in your editor, and add the following lines. You will need to reboot after making these changes:
dtoverlay=i2c0
dtoverlay=i2c-sensor,i2c0,sht3x
3. Consult the documentation:
A better source for documentation on the SHT3X is the Sensiron website. You will find application & driver software here, but we will not require that for this example.
Instead, we will use documentation for the Linux kernel; specifically: the driver documentation for the SHT3x. This document contains the sysfs interface documentation, and is the key for using the sensor. It does not explain exactly where in /sys these interface files are found, but a bit of digging around, with help from grep revealed its location to be as follows on my RPi 3A+:
$ grep -s sht3x /sys/class/hwmon/*/*
/sys/class/hwmon/hwmon2/name:sht3x
/sys/class/hwmon/hwmon2/uevent:OF_NAME=sht3x
/sys/class/hwmon/hwmon2/uevent:OF_FULLNAME=/soc/i2c@7e205000/sht3x@44
/sys/class/hwmon/hwmon2/uevent:OF_COMPATIBLE_0=sensirion,sht3x
$ cd /sys/class/hwmon/hwmon2
$ ls -l
total 0
lrwxrwxrwx 1 root root    0 Jun  2 21:55 device -> ../../../0-0044
-rw-r--r-- 1 root root 4096 Jun  2 21:55 heater_enable
-r--r--r-- 1 root root 4096 Jun  2 21:55 humidity1_alarm
-r--r--r-- 1 root root 4096 Jun  2 21:55 humidity1_input
-rw-r--r-- 1 root root 4096 Jun  2 21:55 humidity1_max
-rw-r--r-- 1 root root 4096 Jun  2 21:55 humidity1_max_hyst
-rw-r--r-- 1 root root 4096 Jun  2 21:55 humidity1_min
-rw-r--r-- 1 root root 4096 Jun  2 21:55 humidity1_min_hyst
-r--r--r-- 1 root root 4096 Jun  2 21:55 name
lrwxrwxrwx 1 root root    0 Jun  2 21:55 of_node -> ../../../../../../../../firmware/devicetree/base/soc/i2c@7e205000/sht3x@44
drwxr-xr-x 2 root root    0 Jun  2 21:55 power
-rw-r--r-- 1 root root 4096 Jun  2 21:55 repeatability
lrwxrwxrwx 1 root root    0 Jun  2 21:55 subsystem -> ../../../../../../../../class/hwmon
-r--r--r-- 1 root root 4096 Jun  2 21:55 temp1_alarm
-r--r--r-- 1 root root 4096 Jun  2 21:55 temp1_input
-rw-r--r-- 1 root root 4096 Jun  2 21:55 temp1_max
-rw-r--r-- 1 root root 4096 Jun  2 21:55 temp1_max_hyst
-rw-r--r-- 1 root root 4096 Jun  2 21:55 temp1_min
-rw-r--r-- 1 root root 4096 Jun  2 21:55 temp1_min_hyst
-rw-r--r-- 1 root root 4096 Jun  2 21:52 uevent
-rw-r--r-- 1 root root 4096 Jun  2 21:55 update_interval
Which we see matches the kernel documentation for the SHT3X.
Note also that the directory name reflects my use of i2c0 - instead of the default i2c1. i2c1 was already being used for a Real Time Clock on the RPi 3A+ and was not available.
The availability of the driver documentation and sysfs interface description provide for a very straightforward method to control the sensor, and take readings from it. This may perhaps be done most simply using a shell script to read/write the sysfs files:
#!/usr/bin/bash
verify the assumed sysfs folder exists, and contains the correct 'name' file
read current temp & humidity from files
assumed sysfs folders as follows:
/sys/devices/platform/soc/3f205000.i2c/i2c-0/0-0044/hwmon/hwmon2
/sys/class/hwmon/hwmon2 (a symlink to /sys/devices/...)
use 'grep -s sht3x /sys/class/hwmon//' to locate the correct folder in sysfs
dev_fldr="/sys/class/hwmon/hwmon2"

check that $dev_fldr exists, that the file 'name' exists in it, and that the file contains 'sht3X'
if [ -d "$dev_fldr" ] && [ -f "$dev_fldr/name" ] && [ $(< "$dev_fldr/name") = "sht3x" ]; then
    dev_nm="sht3x"
else
    echo "ERROR fm $0: The named sysfs folder: $dev_fldr - appears to be incorrect."
    echo "run the command: 'grep -s sht3x /sys/class/hwmon//' to relocate dev_fldr"
    echo "and update this script with the new value/location."
    exit 1
fi
Fahrenheit = (Celsius * 1.8) + 32
read sht3x sensor's temperature & humidity data
denominator=1000
temp_c=$(< "$dev_fldr/temp1_input")
t_c=$(echo "scale=1; $temp_c / $denominator" | bc)
t_f=$(echo "scale=1; ($t_c * 1.8) + 32" | bc)
echo -e "$t_c deg C\t$t_f deg F"
humid_r=$(< "$dev_fldr/humidity1_input")
h_r=$(echo "scale=1; $humid_r / $denominator" | bc)
echo "$h_r per cent"
printf "Temperature: %4.1f deg C, %5.1f deg F\tHumidity: %4.1f %% relative humidity\n" $t_c $t_f $h_r
This simple script reads temperature and humidity measured by the sensor; each run will yield one measurement each for temperature & humidity. I wanted true floating point calculations in this script, so I installed and used bc. If you'd like to see some alternatives for using floating point numbers in bash I'd suggest this excellent article.
This script implements a one-time measurement. The update_interval file defaults to 0 - for "single-shot mode"; this may be changed by writing an appropriate value to the file.
EDIT:
The problem with this answer is that sysfs is re-written by the kernel at each boot, and there's no guarantee that the kernel will always use the same device folder name!! Since we depend upon an invariant sysfs folder name in the above script - we're screwed!!.
There are two (maybe more??) methods to deal with this inconvenience:
Incorporate a grep or find function in the script to re-locate the correct device folder (kinda' hack-y IMHO), or ...
Use udev to create a symlink to the correct folder.
I chose udev. I've written that solution up here as a recipe as it would have made this answer even longer!
The udev solution is to create a new file at /etc/udev/rules.d/80-local.rules with the following single line in it:
ACTION=="add", SUBSYSTEM=="hwmon", ATTR{name}=="sht3x", KERNELS=="0-0044", SUBSYSTEMS=="i2c", SYMLINK+="i2c_sht3x"
There was also a corresponding change to the bash script as follows:
# FROM:
dev_fldr="/sys/class/hwmon/hwmon2"
# TO:
dev_fldr="/dev/hwmon_sht3x"
The explanations got rather lengthy, and I chose not to incorporate them here. If you're interested, see the recipe for the sht3x script, and the recipe for the udev stuff at my GitHub site.