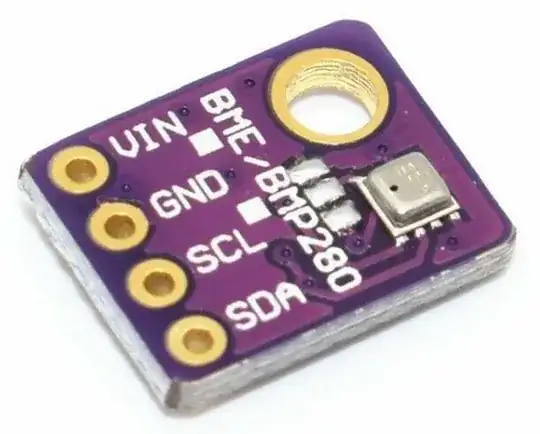
I have a Raspberry Pi 3B+ and I bought two BME280 sensors (specifically these) and I would like to connect them via I2C. I read that you can do software multiplexing but all the information I am finding is incomplete, makes assumptions, or people are commenting that it doesn't work. Can anyone please let me know what I need to do? For the record, I've already hooked up one of them and am getting the readings correctly, but I need both of them connected.
2 Answers
In general, every I2C device has its own address, and one can connect many devices to the same port e.g. of the PI. Individual communication is possible via those addresses. (This is something you set in your program code)
Now, it should be clear that this only works if each device has its own, unique address on the port. If you buy a hand full of those sensors, each has the same address, and hence, you can not connect them to the same I2C port on the PI.
As written in the comments, you can
- use two I2C ports - if you have two ports
- use an I2C multiplexer, which is kind of a relay allowing to switch between devices.
But there is a build-in solution. The address of I2C devices is often hard coded, sometimes completely configurable, and sometimes, the last one or two bits can be configured.
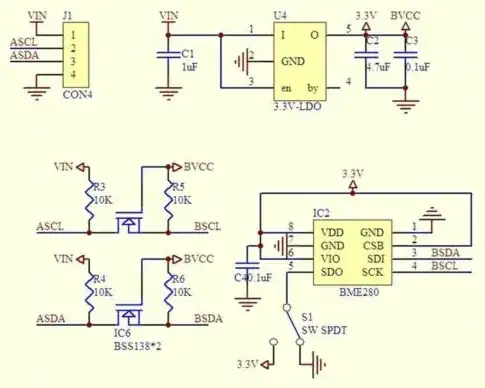
If you read the datasheet of the BME280 sensor, the pin SDO defines lowest bit of the Adress. By default, it is connected to GND, resulting in address 76. When connected to 3.3V, the address is 77. This allows to connect two BME280 sensors to the same I2C port of the PI at the same time, and to communicate with each via its unique address.
The link you provide shows the schematic of the PCB, which contains a switch S1 for exactly this:
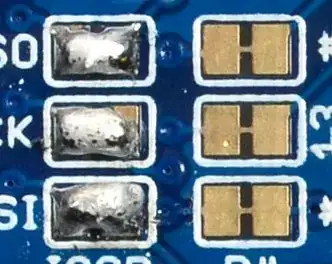
There is no physical switch on the PCB, instead, there is a solder jumper consisting of the three pads in a row next to the sensor:
The center pad is connected to the SDO pin of the sensor, the upper left to GND, and the lower right to 3.3V.
By default, the center pad should be connected to the upper left pad, but you need it to be connected to the lower right one instead! (But only for ONE of your two sensors). This simply needs a soldering iron and a little solder.
Now, there should be a blob of solder connecting the center and upper left pad, similar as on the left side on this picture:
I do not see this blob on the picture of your PCB, may be, your real PCBs have them, maybe, not.
If not, the two pads are for sure connected by a thin copper track, as on the right side in the image from me above. If this is the case, this thin copper track must be removed with a sharp knife. I don't see such track on the photo of your PCB. It might be covered with the violet paint, so you should carefully check it.
(FYI: The reason for the small copper track is that the blob needs lots of solder, while industrial soldering processes use very little solder. So, such blobs need to be placed by hand. To avoid this, that small copper tracks are used, so the few people which ever want to modify something here, would need to cut that track, first.)
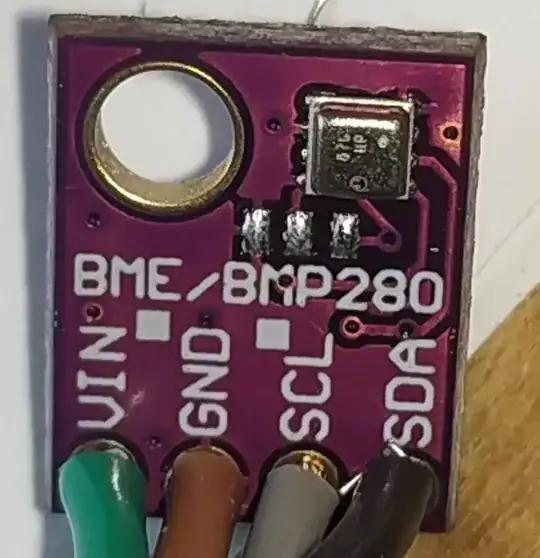
As you uploaded a high resolution image of the PCB:
It is exactly what I wrote. There is a track between the central and the left pad, covered with violet solder mask.
- Remove the track between the pads with a sharp knife.
- Connect central pad with right pad with some solder.
- Attach the sensor to the PI, and run
sudo i2cdetect -y 1.
This will scan for I2C devices and display the addresses of the found ones in a table. - Do the same for the unmodified sensor. Its address should differ by one from the other address.
- Attach both sensors. That is: Pin 1 of both together to the correct pin of the PI, pin 2 of both together to the correct pin, and so on...
- Run the command again. It should now find both devices!
That's all from the hardware side. Your software will still talk to the unmodified sensor. Alter the address by 1 in the software to communicate with the other.
- 516
- 2
- 3
Update: in newer version of BME 280 chip, the track connecting the left and center pads is not between them, but goes up directly to the chip, as you can see in this photo. I succesfully changed the address to 0x77 by cutting that track and connecting the right and central pads.
- 11
- 1


