5

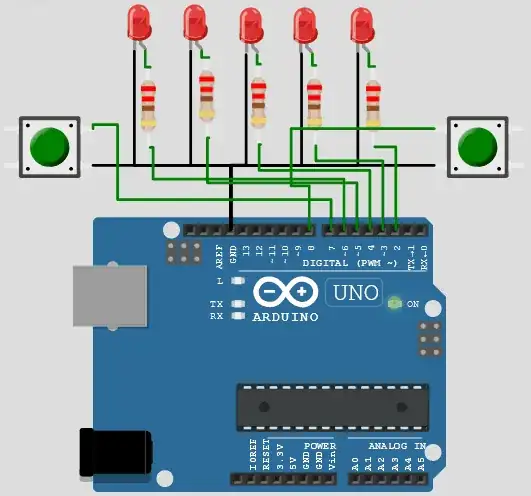
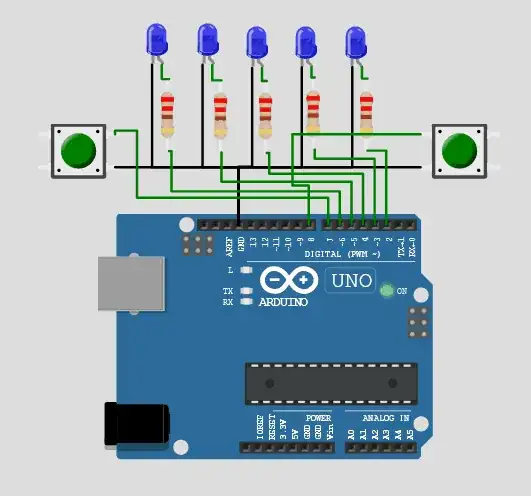
So, I've just started programming Arduino (and also in general), so I'm doing basic things, like switching on and off LED's.

I've made them light in a sequence and then turning them off (in the same sequence), and now I wanted to use 2 buttons, one to make them do the same thing as before (light and turning LED's off in sequence) repeatedly, and the other to turn them off.

The problem is that curently they only light up once, and not repeatedly, I think I would've needed another loop, but i found out that you can't use 2 of them.

Can anyone help me? here's the code

int LED1 = 2;
int LED2 = 3;
int LED3 = 4;
int LED4 = 5;
int LED5 = 6;
int buttonON = 7;
int buttonOFF = 8;

void setup() { pinMode(LED1, OUTPUT); pinMode(LED2, OUTPUT); pinMode(LED3, OUTPUT); pinMode(LED4, OUTPUT); pinMode(LED5, OUTPUT); pinMode(buttonON, INPUT_PULLUP); pinMode(buttonOFF, INPUT_PULLUP); }

void loop () { if (digitalRead(buttonON)== LOW) { delay(300), digitalWrite(LED1, HIGH); delay(50), digitalWrite(LED2, HIGH); delay(50), digitalWrite(LED3, HIGH); delay(50), digitalWrite(LED4, HIGH); delay(50), digitalWrite(LED5, HIGH); delay(300), digitalWrite(LED1, LOW); delay(100), digitalWrite(LED2, LOW); delay(100), digitalWrite(LED3, LOW); delay(100), digitalWrite(LED4, LOW); delay(100), digitalWrite(LED5, LOW); } if (digitalRead(buttonOFF)== LOW) { digitalWrite(LED1, LOW); digitalWrite(LED2, LOW); digitalWrite(LED3, LOW); digitalWrite(LED4, LOW); digitalWrite(LED5, LOW); } }

P.S. if anyone has other general tips I would really apreciate them
AndreFro
  • 53
  • 6

3 Answers3

6

By using delay() it blocks the rest of the code. The programme needs to keep track of two buttons and update the lightshow at appropriate times, therefore a non-blocking style of coding is needed similar to the Blink Without Delay example where the delay() is replaced with a timer using millis() that is checked periodically. This allows other things to be checked periodically as well, e.g. the buttons.

Also the button contacts tend to bounce several times for several milliseconds when they change state sending a train of on/off pulses to the MCU, so they need to be debounced. You can find many debouncing algorithms online, but here's a simple debouncer that I put on GitHub.

void loop ()
{
  static bool doLightshow = false;

static Debouncer buttonOn(buttonON); static Debouncer buttonOff(buttonOFF);

buttonOn.Update(); buttonOff.Update();

if (buttonOn.Fall()) { Serial.println("buttonOn falling edge."); doLightshow = true; } else if (buttonOff.Fall()) { Serial.println("buttonOff falling edge."); doLightshow = false; }

if (doLightshow) { // Do lightshow. . . . } else { digitalWrite(LED1, LOW); digitalWrite(LED2, LOW); digitalWrite(LED3, LOW); digitalWrite(LED4, LOW); digitalWrite(LED5, LOW); } }

Due to the way you've neatly written your code, you can probably pick out a pattern in the lightshow.

State Delay time LED pin LED state
0 300 LED1 HIGH
1 50 LED2 HIGH
2 50 LED3 HIGH
3 50 LED4 HIGH
4 50 LED5 HIGH
5 300 LED1 LOW
6 100 LED2 LOW
7 100 LED3 LOW
8 100 LED4 LOW
9 100 LED5 LOW

This lends itself well to creating a Finite State Machine that can be stored in an array of structures:

typedef struct LightshowData
{
  unsigned int delayTime;
  byte ledPin;
  bool ledState;
};

const byte numStates = 10;

const LightshowData lightshowData[numStates] = { { 300, LED1, HIGH }, { 50, LED2, HIGH }, { 50, LED3, HIGH }, { 50, LED4, HIGH }, { 50, LED5, HIGH }, { 300, LED1, LOW }, { 100, LED2, LOW }, { 100, LED3, LOW }, { 100, LED4, LOW }, { 100, LED5, LOW } };

The state machine can now cycle through the array in a non-blocking manner:

    // Do lightshow.
    static byte state = 0;
    unsigned long currentTimestamp = millis();
    static unsigned long previousTimestamp = currentTimestamp;
if (currentTimestamp - previousTimestamp >= lightshowData[state].delayTime)
{
  previousTimestamp += lightshowData[state].delayTime;
  digitalWrite(lightshowData[state].ledPin, lightshowData[state].ledState);
  state = ++state % numStates;
  Serial.print("state = ");
  Serial.println(state);
}

You may want to reset state to 0 after a negative edge on buttonOff, otherwise the lightshow will continue where it left off after being stopped and restarted.

Here's the Wokwi simulation of the lightshow with 250 Ω protection resistors for the LEDs.

Wokwi simulates button bounce by default to more accurately model the real world, so it's advisable to have some form of button debouncing.

tim
  • 699
  • 6
  • 15
3

You have written your question beautifully. In your case, according to your logic, the button has to be kept pressed, so that the LEDs are lit in the order you desire. The single loop() function is part of the Arduino sketch but it is never a limitation.

One way to solve your problem is to make the LED drive logic independent of the button press state.

  • Once you detect the button press, store the event in one variable.
  • Let us call it ButtonStatus.
  • So, soon after the keypress is detected, update the ButtonStatus variable to TRUE.
  • Your LED drive logic can check this variable value to decide whether to drive the LEDs or not
  • Soon after you detect another press of the second button, you can update the variable value to FALSE.
    Here is the Arduino simulation output for your code and the code suggested by @cat

enter image description here

below is after adapting the solution from cat enter image description here

The simulation links are here: Original problem solution 1

int LED1 = 2;
int LED2 = 3;
int LED3 = 4;
int LED4 = 5;
int LED5 = 6;
int buttonON = 7;
int buttonOFF = 8;
int ledEffectON;
void setup()
{
  pinMode(LED1, OUTPUT); 
  pinMode(LED2, OUTPUT);
  pinMode(LED3, OUTPUT);
  pinMode(LED4, OUTPUT);
  pinMode(LED5, OUTPUT);
  pinMode(buttonON, INPUT_PULLUP);
  pinMode(buttonOFF, INPUT_PULLUP);
}

void loop () { if (digitalRead(buttonON)== LOW) ledEffectON = true;

if (digitalRead(buttonOFF)== LOW) ledEffectON = false;

if(ledEffectON) { delay(300), digitalWrite(LED1, HIGH); delay(50), digitalWrite(LED2, HIGH); delay(50), digitalWrite(LED3, HIGH); delay(50), digitalWrite(LED4, HIGH); delay(50), digitalWrite(LED5, HIGH); delay(300), digitalWrite(LED1, LOW); delay(100), digitalWrite(LED2, LOW); delay(100), digitalWrite(LED3, LOW); delay(100), digitalWrite(LED4, LOW); delay(100), digitalWrite(LED5, LOW); } }

Link to docs on Pushbuttons. Wokwi Arduino simulator simulates debounce by default - just like real-world switched. Debounce is a very important technique that you should consider adding to the code. To disable the "bounce" option, use the below trick!

{ "bounce": "0" }
ArduinoFan
  • 1,079
  • 7
  • 11
2

You simply need to save the state of the LEDs in a new variable ...

void loop ()
{
  if (digitalRead(buttonON)== LOW)
      ledEffectON = true;

if (digitalRead(buttonOFF)== LOW) ledEffectON = false;

if(ledEffectON) { delay(300), digitalWrite(LED1, HIGH); delay(50), digitalWrite(LED2, HIGH); delay(50), digitalWrite(LED3, HIGH); delay(50), digitalWrite(LED4, HIGH); delay(50), digitalWrite(LED5, HIGH); delay(300), digitalWrite(LED1, LOW); delay(100), digitalWrite(LED2, LOW); delay(100), digitalWrite(LED3, LOW); delay(100), digitalWrite(LED4, LOW); delay(100), digitalWrite(LED5, LOW); } }

cat
  • 177
  • 3