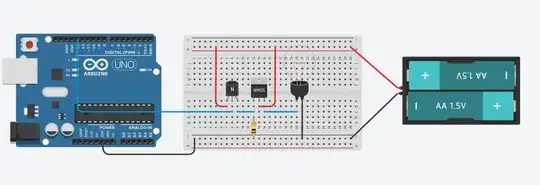
Apologies for the simple question, I really couldn’t find any help online with this as when I kept searching, the results had lights that had way too much voltage compared to what I need.
So I have a simple light decoration that requires around 3v and comes with a battery pack to power it (2AA batteries) and I took it apart and was able to connect them via a breadboard to test if is all working.
How do incorporate the Arduino into it so that I can switch the lights on through the Arduino? A lot of the small voltage videos I saw were just simple connecting 1 LED through a digital pin but that’s not enough current for the lights I have and I’m not experienced enough to find myself a solution so help would be greatly appreciated.
For little more info, the 3.3v and 5v pins my Arduino (uno) are already taken up.
Also, I’ll be turning the lights on and off with an IR Remote which I’ve already programmed to a servo that’s powered through the USB supply (5v) and the IR Sensor is connected to the 3.3V.
Sorry if the question was badly worded.
