19

I have played a bit around with a Arduino Uno that came in a kit with a breadboard and components. Soon I would like to make some more permanent things.

I would prefer a smaller and cheaper unit than the Arduino Uno but that is almost as easy to use as the Arduino Uno, and very similar to use.

Is the Arduino Pro Mini 328 - 5V/16MHz a logical next step? At 1/6 of the size of the Arduino Uno it is plenty small. At 10 $ a piece the price is also good.

I understand that I must solder to get it to work. That should not be a problem.

Will I also need a USB serial board to program the unit?

sa_leinad
  • 3,218
  • 2
  • 23
  • 51
Andy
  • 293
  • 1
  • 2
  • 7

6 Answers6

12

I think the first best choice is to remove the ATMega328p-pu chip from your Arduino UNO and incorporate it into your final circuit. The chips are only about $1.50.

That way, you can just use your UNO as a programmer instead of the final device that you deploy.

I'm not sure why there isn't more documentation about the proper way to remove the ATMega328p-pu chip and using it on your breadboard, after completing your programming.

I explain exactly how to do this on my blog: http://raddev.us/arduino/post/2018/07/03/arduino-uno-using-your-atmega328p-u-as-stand-alone

But, here are the basics. 
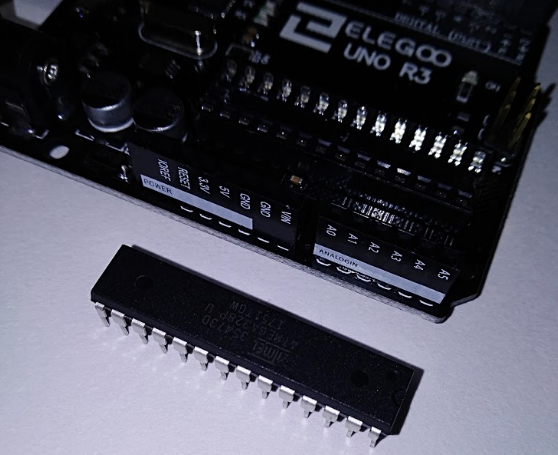
First you remove the chip. It will look like the following after you do so. (Note: I'm using the Elegoo clone of an UNO).

atmega328p-pu chip removed

Next, you apply power to pin 7 and connect pin 8 to GND.

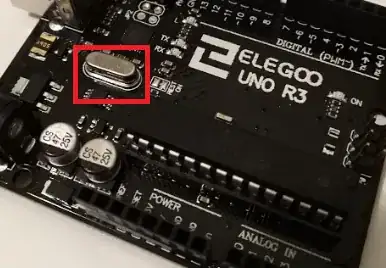
Need A 16MHz Crystal

But, the chip won't seem to run your sketch at this point. 
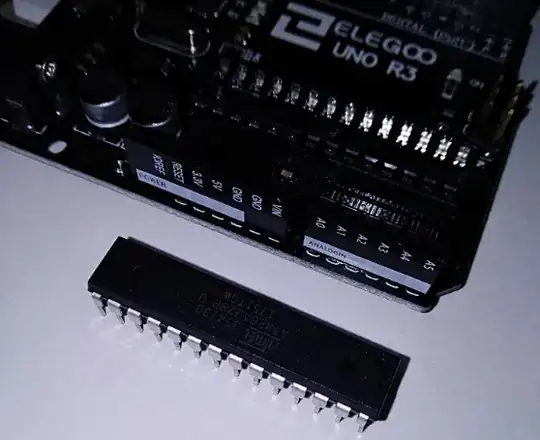
That's because you actually need a crystal to run at 16MHz.

The UNO board has that chip installed and that is why it works. You can see it here:

16MHz crystal on UNO

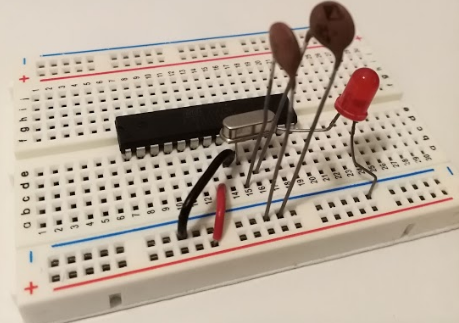
Finally you add the 16MHz crystal and a couple of 22pF caps and your chip will run standalone (no UNO).

You add the crystal to pins 9 & 10. You can see all the details by reading my blog entry or reading the atmega328 datasheet.

crystal on breadboard

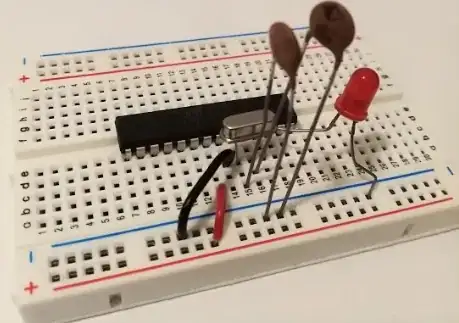
Finally, Just Wire Everything Else Up

After that, just wire the rest of your circuit up to the proper pins and you can run your ATMega328p-pu standalone.

It's actually a nice learning experience too.
Just buy replacement atmega328p-pu chips for your UNO and you can create all the projects you want to for very cheap.

raddevus
  • 442
  • 3
  • 19
7

Check the STM32F103C8T6 development board, cost about $ 1.5, and is faster/has more memory than the Arduino Uno, and is much smaller.

It can work with the Arduino IDE, but not all libraries are supported, so check before you want to use it if your used libraries are supported, or if there are different libraries you can use instead.

Update

Differences:

                       Arduino Uno       STM32F103C8T6 Mini Dev Board

MicroController            Atmega328P           Cortex M3
MIPS/MHz                        1                   1.25
Operating Voltage [V]           5                   3.3, most pins 5V tolerant
Input Voltage   [V]            7-12               USB only
Input Voltage (limit) [V]      6-20                (USB)
Digital I/O Pins               16                   37
From them:PWM Digital I/O Pins  6                   12
Analog Input Pins               6                   10
DC Current per I/O Pin [mA]    20                    ?
DC Current for 3.3V Pin [mA]   50                    ?
Flash [KB}                     32                   64
SRAM [KB]                       2                   20
EEPROM [KB]                     1                    -
Clock Speed [MHz]              16                   72

I2C                             1                    2
SPI                             1                    2 (18 MBit/s)
UART                            1                    3
CAN                             0                    1
USB                             0          USB 2.0 FS 12 MBit        
DMA                             0          7 channels (ATsP, SPI, I2C, USART)
RTC                             0                    1
CRC                             0                    1
Unique ID                       0                    1

Programmed by                  USB                 SWD Debug (around $5)

IDE                         Arduino IDE         Arduino IDE, CubeMX, ...
Libraries                      Many               Limited

Dimensions  [mm]            68.6 x 53.4           53 x 22
Weight       [g]               25                    ?
Price (cheapest)  [$]         2.50                 1.50

Note: as written earlier, despite the mostly better specs, not all libraries are supported. Also a programmer need to be bought (only once, cost about $5).

Michel Keijzers
  • 13,014
  • 7
  • 41
  • 58
7

For my product, I went from an Arduino Uno:

Arduino Uno R3

to the Arduino Pro Mini:

Arduino Pro Mini

Yes you will need a FTDI cable for programming and serial coms to the PC, but providing you don't need coms all the time, you will only need the one cable to upload the program to each device. They can be found pretty cheap too.

However I notice that the Arduino Pro Mini is retired now, so it may be a bit harder to source (it is still available on AliExpress). So for this reason, I suggest that you instead try the Arduino Nano:

Arduino Nano

which has the added advantage of onboard USB, meaning you no longer need the FTDI cable for programming or coms.

The ATMega328P that is the processor of these 3 boards does not have native USB, which means that the board also needs to include the FTDI FT232RL IC that is used in the FTDI cable. Having this IC can add additional costs to your bottom line.

For a few dollars cheaper per device, you can use a microcontroller (such as the ATMega32U4) that has native USB coms (and hence you save on the FTDI IC). One such product is the Arduino Micro:

Arduino Micro

All of these boards mentioned are native within the Arduino Ecosystem and (apart from the retired Pro Mini) should be easy to source online or at your local electronics shop. Your Arduino Uno program will work for all of these alternatives - you just have to change the board in the Arduino IDE:

Arduino Board Selection

There is one more board that I would like to mention - the DigiSpark:

Digispark

It is only suitable for smaller programs, is limited in some of its features and is not an oficial Arduino board. Having said that, there is plenty of Arduino support - and its cheap!

sa_leinad
  • 3,218
  • 2
  • 23
  • 51
4

I like the Nano and the Pro Mini. I like to work with it on a breadboard with other modules. If there is more circuitry involved I found it much more convenient than using an Uno. There are faster processors but for a lot of projects the 16Mhz 328 is more than sufficient. And like the Uno, these two are 5 volt powered parts. Sometimes what you need to connect to doesn't work well with 3.3 volt processors.

The Pro Mini and the Nano with easily be soldered into 0.1" spaced "Veroboard" (or equivalent) If you don't mind buying cloned parts, the cost of a Nano and Pro Mini is only a couple of dollars. Buying parts off Aliexpress, or even Ebay, can save you a lot, as long as you are patient when it comes to delivery.

The module that I am now use most often is the ESP8266. It is a powerful WiFi platform that only costs a few dollars and has quite a mature Arduino framework. Often I use this as the only processor in the design. I have even used it as the basis for a data logger and completely ignored the WiFi capability. 20x4 character LCD, current/voltage measurement chip (INA219), and a SD memory card, powered by a 18650 lithium battery.

There are lots of good inexpensive options.

Rudy
  • 993
  • 5
  • 12
4

If you want to stick with using Arduino and it's toolchain, you can order just a bare ATmega 328p (the microcontroller at the heart of the Arduino Uno) and use it by itself!

They're fairly low cost ($1.50-$3.00 range) and are breadboard friendly. For a more permanent solution, you can solder them into a proto-board (perfboard), or even a custom designed circuit board once your design gets to that level.

Here's an excellent guide from the Arduino folks about setting up an Arduino on a breadboard, using only raw components such as the ATmega 328p. This design uses an external 16MHz clock crystal, just like an Arduino Uno.

If you're OK with using the internal 8MHz clock onboard the 328p, you can do away with most of the extra components and just run the raw chip like in this guide (using the Arduino Lilypad Bootloader instead of the default Arduino bootloader). This will save even more money!

Either way, you'll need an AVR Programmer unit, since there is no USB port built into the 328p. This will be the most expensive part of this setup, but good news is you only need one, and it can program any 328p's you need. They can also be used to program non-standard chips that are capable of being programmed over Serial Tx/Rx pins, such as the ESP chips (you just hand-wire them). Very useful to have one of these if you're serious about these types of microcontrollers.

ATmega 328p Microcontroller Chip

ATMega Pin Stickers

Perfboard

AVR Programmer

SnakeDoc
  • 148
  • 5
2

Arduino Pro Micro clones are super cheap and all you need to program them is a normal micro USB cable. You will probably have to solder the headers to do anything useful. They are available in a 3.3V/8MHz and a 5V/16Mhz version.

Pro Micro

AndreKR
  • 190
  • 9